Photography / Camera Settings
Camera Settings & Equipment
One Standardized Setup, Every Provider, Every Session
Consistent, compliant, repeatable
Whoever happens to be on shift needs to produce the same quality photo as whoever shot it last month, and a creative setup that only one person can operate breaks the first time they’re out sick. This guide covers a standardized shooting station, recommended equipment, and the exact camera settings your practice should use every session, no exceptions. The goal is repeatability, not artistry: a consistent, slightly boring setup beats a creative one that can’t be reproduced. It closes with patient positioning guidance and an equipment shopping list. Set it up the same way every time.
Recommended Equipment
Four fixed roles — camera, lighting, tripod, backdrop — standardized practice-wide so every provider’s shots match.
| Role | Recommendation | Why |
|---|---|---|
| Camera | High-resolution mirrorless (e.g. Canon EOS R) or a current iPhone Pro | Enough resolution for print/web use and manual exposure control |
| Lighting | Ring light or softbox kit | Even illumination, minimizes shadows across every session |
| Tripod | Fixed-height tripod (e.g. Manfrotto Compact Action) | Stability and a truly repeatable camera position |
| Backdrop | Neutral seamless paper, light blue or gray | No pattern or clutter competing with the subject |
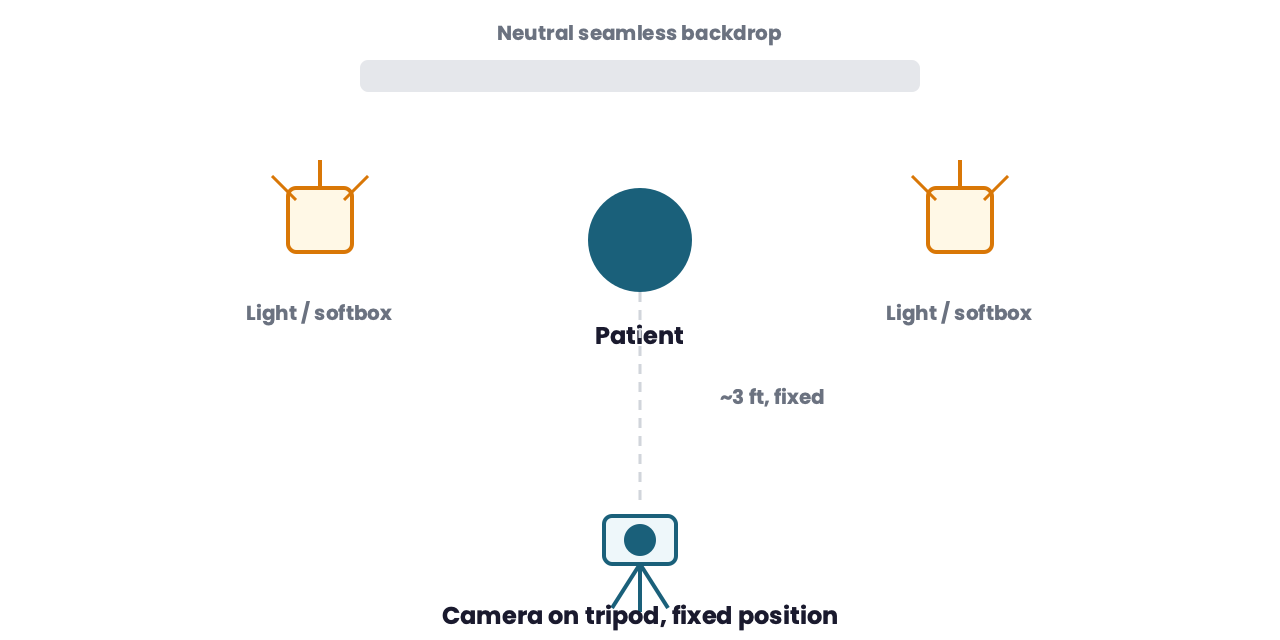
Shooting Station Setup
Overhead view of a standardized station: patient centered against the backdrop, lights at roughly 45°, camera on a tripod at a fixed distance.
Camera Settings
The goal of every setting below is the same: remove variables that could drift between a before and an after session.
| Setting | Recommendation | Why |
|---|---|---|
| Mode | Manual (M) | Locks exposure so lighting doesn’t drift between before and after sessions. |
| Shutter speed | 1/125s or faster | Minimizes motion blur from small patient movement. |
| Aperture | f/8 | Enough depth of field to keep the whole head sharp at a fixed distance. |
| ISO | 100–200 | Lowest usable ISO for the room’s light; keeps noise out of skin/scalp detail. |
| White balance | Manual, ~5500K, set from a gray card | Auto white balance drifts between sessions; manual keeps skin tone consistent. |
| Focus | Manual focus | Guarantees sharp focus on the area of interest instead of the camera guessing. |
| File format | RAW + JPEG | RAW preserves the detail needed for accurate color correction later. |
Patient Positioning
Positioning consistency matters as much as the camera settings.
Fixed distance
Position the patient at a consistent distance from the camera — about 3 feet is the standard reference used across the industry.
Standard views
Capture the same views every time: frontal, vertex, and rear (plus both laterals for hair restoration specifically — see the Before & After Photography guide).
Anatomical landmarks
Use a fixed landmark — eyebrows or ears work well — so the same head area lines up in frame across every session.
Write the exact settings (aperture, ISO, distance marker, light setup) on an index card taped near the shooting station. Whoever is on shift that day should be able to reproduce the identical setup without asking.
Standardize equipment across the whole practice, not per-provider. If two staff members use different cameras or lighting rigs on different days, the same patient’s before and after photos won’t match.
Recommended Equipment — Shopping List
These are category links, not a specific-brand endorsement — the named examples above (Canon EOS R, Manfrotto) are illustrative, not required. Pick the option in your budget that meets the settings below, and standardize on one set per practice so every provider’s photos match.
One more shot
Know a practice whose before-and-afters could use this kind of polish?
Refer them in and earn when they come on board.